Flat Rate Shipping: $9.99+
48 Hour Shipping


CALIFORNIA WARNING: This product can expose you to chemicals, including lead and DEHP, which are known to the State of California to cause cancer and birth defects, or other reproductive harm. For more information, go to https://www.p65warnings.ca.gov.
NEW! PINSCORE Display Systems!
Brilliant design makes brilliant displays. New PINSCORE LED displays for pinball machines are the best performing, most feature-packed and economical replacement systems for obsolete glass plasma digital displays.
This PINSCORE Model PS-12232-P16-R2 Display System fits the following Williams machines:
RIVERBOAT GAMBLER
Plug & Play installation
Adjustable brightness
Low power consumption uses only 5V power and no high voltage
Beautiful black matte finish
Foam light shields prevent general illumination leakage glare
Crisp alpha-numeric digits illuminate in original font & color
2 year warranty
Designed and assembled in USA
Kit Contents:
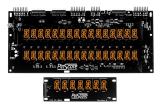
(1) PS-12232 PINSCORE Master Board Rev B
(2) PS-10866 PINSCORE LED 7 digit Display
(2) PS-LS-7 Foam light shields (pre-assembled)
(2) PS-LS-16 Foam light shields (pre-assembled)
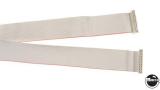
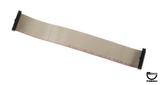
(1) 5795-10938-30 - Ribbon Cable - 26 pin 30 inch
(1) 5795-10938-40 - Ribbon Cable - 26 pin 40 inch
INSTALLATION INSTRUCTIONS:
Installation time: about 20 minutes.
Tools required:1/4” nutdriver and/or Phillips screwdriver
A. Remove Old Displays.
1.Turn off and unplug the main power from your pinball machine.
2. Remove game backglass (Check owner’s manual for specific instructions).
3. Unplug all display boards, connecting cables and remove original display boards from backbox.
B. Mount the new boards.
1. Hand-tighten the screws so that you may align the displays with the backglass windows before finally securing the board.
2. If further alignment is necessary, you may adjust the insert panel door hinges and latch in the backbox.
C. Connect the cables.
1. Attach the original power cables to the board. These are all keyed and will only fit in the correct connectors.
2. Attach the flat ribbon cable that connects the MPU board to the connector labeled MPU Cable (J4). Make sure to align the red-striped side of the cable with Pin No.1 on the connector, which faces the test switch and is labeled "RED".
3. Attach the included new ribbon cables to the satellite displays, again being sure to align the red stripe with Pin 1, labeled "RED" on the board and located toward the bottom edge of the board. Attach the other end of the ribbon cable to the left and right side External Display connectors. (J2).
4. Double-check all connections, plug in the machine, and turn the game on. The LED’s will light up. Pressing the diagnostic pushbutton labeled SW1/DISPLAY TEST on the PS-12232 board will illuminate all segments of all displays. This indicates that all components of the PINSCORE System are operating correctly.
The thumbwheel BRIGHTNESS control labeled R10 on the right side of the board allows you to set your preferred illumination level.
Reference:
UDN7180A
D-12232
D-12232-1